sábado, 3 de agosto de 2013

Rosa de Tecido e Feltro

Material:
Feltro
Tecido de algodão
Linha de costura
Termolina leitosa
Pincel
Tesoura
Agulha
Modo de fazer:
Corte o feltro e o tecido de acordo com o molde. Passe termolina leitosa nas pontinhas do tecido (na ponta arredondada) para o mesmo não desfiar.
Depois de seco, junte o feltro ao tecido alinhavando a parte de baixo.
Depois de alinhavado, puxe pra fazer um leve franzido…
Comece a enrolar a tira em torno dela mesmo e vá costurando pela parte baixo.
Vá fazendo isso em toda extensão da rosa. Não aperte muito.
Depois de toda enrolada, arremate.
Vá abrindo as pétalas, puxando para baixo, para formar a rosa.
Peça finalizada! Essa rosa pode ser usada tanto como broche, quanto como presilha.

Bolsa de Suéter

Bolsa-feita-com-suéter8
A bolsa feita com suéter dará nova utilidade aquela blusa que está guardada no armário saberá Deus há quanto tempo… É uma ótima opção para fazer um acessório para si mesma, ou para presentear alguém.
Este é um dos artesanatos mais práticos que se pode aprender. E para compô-lo, basta um suéter, linha, agulha e menos de meia hora do seu tempo.
Materiais:
    Suéter 
    Tesoura 
    Linha 
    Agulha
Passo-a-passo:
Pegue uma bolsa que já tenha para medir o tamanho desejado. Faça o corte a partir da parte de baixo, ou seja, as nervuras do suéter serão não só a “boca” da bolsa, mas também a parte decorativa.
Num corte só, retire tanto a parte da frente, quanto a parte de trás, assim vai garantir que o tamanho das duas partes sejam exatamente iguais.
Coloque os dois lados um contra o outro pelo lado do avesso, e costure os lados e o fundo da bolsa, mas tenha o cuidado de não costurar o topo, deixe uma boa margem pois mais à frente, vai virar a parte das nervuras para fora.
Vire a peça costurada para o lado direito. Agora sim, costure a parte de cima. Em seguida, corte duas fendas horizontais em cada lateral, cerca de 2 centímetros abaixo da extremidade, para inserir as alças.
Na sequência, retire duas tiras de 20 centímetros do suéter, para fazer as alças. Costure de maneira a ter cada alça com 2,5 centímetros de largura. Se preferir, todavia, poderá substituir por alças de couro, que poderá comprar numa loja de artesanato.
Mas para fazer as alças a partir do suéter, costure pelo lado avesso, e depois desvire. Costure-as nas fendas que deixou anteriormente. Vire a parte da nevura para baixo, e estará pronto.
Para deixar a bolsa ainda mais costumizada, pregue botões em padrões disformes no lado que fica à vista.
Para fazer o fecho da bolsa há duas opções. Ou faz fendas ao longo da boca da bolsa, e costura uma nova alça para entrelaçar, sendo essa tira longa o suficiente para amarrar com uma laçada. Ou faça 3 ou 4 fendas somente num dos lados, e pregue botões no lado oposto, podendo assim, fechá-la.
Bolsa-feita-com-suéter2
Bolsa-feita-com-suéter3

Bolsa Lápis

Saudações!!
Pois é, eu ainda existo kkkkk. O blog ficou por um tempo parado, mas estou voltando hein...
E hoje, com este delicioso sábado, gostaria de compartilhar um idéia muuuuuuito legal que encontrei aqui oh http://www.gwennypenny.com/2011/08/pencil-pouch-tutorial.html

Para as costureiras e criativas de plantão, veja que bolsinha show...
Gente, visite o site tah, mas pena que está em inglês, caso não compreenda alguma coisa, GOOGLE TRADUTOR \0/

Espero que gostem

bjins

I love back to school time. The aisles of notebooks, folders, pens, glue sticks, boxes of brand new pencils. When I was a teacher, I had so much trouble with kids showing up to class day after day without anything to write with. That's how I came up with my project for the August Point of View reveal...


A pencil pouch is a great way to keep pencils and pens in one place. How cute would this be tucked in a backpack? I'm so happy with how this turned out. I had it all planned out, but I was doubting how the zipper would work at the pencil point end. Luckily, all went well. Want to make a few of your own? Here's the how-to...

Materials:
  • scraps of black, cream, yellow, gray, and pink fabric
  • lining fabric
  • fusible fleece
  • 9" zipper
  • thread
  • water soluble fabric marking pencil
  • ruler
  • rotary cutter or scissors
  • zipper foot

Instructions:

Step 1: Start by cutting all of your fabric. You'll need two pieces of each of the following...
            Black - 1.25" x 3.5"
            Cream - 1.75" x 3.5"
            Yellow - 6" x 3.5"
            Gray - 1.5" x 3.5"
            Pink - 2" x 3.5"
            Lining - 10.25" x 3.5"
            Fusible Fleece - 10.25" x 3.5"


Step 2: Next, assemble the exterior pouch pieces. Lay out your pieces in this order...


Sew these pieces together using a 1/4" seam allowance. Do this for both sets of "pencil" pieces. When done, press the seams open on the back.


Step 3: Apply your fusible fleece to the wrong side of each "pencil" piece from Step 2 following the manufacturer's directions.

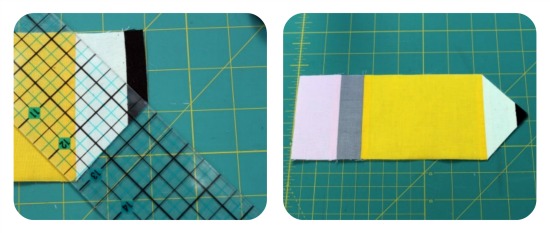
Step 4: You'll need to mark where you want the point of your pencil. Measure down 1.75" from the top edge of your "pencil" and make a mark on the outside edge of the black fabric. Line up your ruler from this point to the point on the bottom of the "pencil" where the cream fabric meets the yellow fabric. Cut along this line.


Repeat on the opposite edge to create your point.


Step 5: Repeat Step 4 for your second "pencil" piece.

Step 6: Add some topstitching to the gray fabric to make it look more like the little metal band around your pencil. I added two equally spaced rows to each of the "pencil" pieces.


Step 7: Next, you need to cut the pencil point on your lining fabric. Make sure that you cut the lining pieces in opposite directions if you are using fabric with a pattern on it. I used my "pencil" pieces as a template for cutting the angles on my lining pieces.


Step 8: Time to start assembling your pouch. Take one lining piece and lay it down right side up. Now set your zipper on top, lining up the top edge of your zipper with the top edge of your lining fabric. Center the zipper horizontally along the top straight edge of your lining fabric (since the zipper won't be attached to the angled portion).


Take one of your "pencil" pieces, and lay it right side down (fleece up) on top of the lining/zipper. Make sure the edges of the "pencil" piece line up with the edges of the lining.


Pin all of the layers together, and sew along the top edge using a zipper foot.


Pull all of the layers to one side of the zipper and press, being careful not to set the iron on the zipper teeth.


Step 9: Take your other lining piece and lay it down right side up. Now set your zipper on top, lining up the top edge of your zipper with the top edge of your lining fabric. Make sure that the left and right edges of all the layers line up.


Take your other "pencil" piece and lay it on top of all your other pieces right side down (fleece up), lining up the top edge with the top edge of your zipper. Make sure that the left and right edges of all the layers line up.


Pin all of the layers together.


Sew along the top edge using a zipper foot.


Step 10: Pull the layers from Step 9 to one side and press. It should now look like this...


Unzip your zipper to about 2" from the end.


Take your lining pieces and bring them together, right sides facing. Take your "pencil" pieces and bring them together, right sides facing.


Pin together, making sure that the teeth of your zipper are pointed toward the lining.


Sew all the way around using a 1/4" seam allowance and leaving a 2" opening along the bottom of the lining. Go over the zipper a couple of times to reinforce it.


Step 11: Clip your corners, and cut off the excess zipper on either side (even with the edges of the fabric). Turn the pouch right side out through the opening in the lining. Press. Sew the opening in the lining closed, and tuck the lining into the pouch. Press again.


You now have a cute pencil pouch, perfect for back to school!


You can also personalize your pencil pouch by adding a name, initials, embellishments. Try hand stamping, embroidery, applique. Lots of options. And it doesn't hurt that this pouch goes together pretty quickly, too. Have fun with it!

Now it's your turn... Check out this month's Point of View collage and link up your past or present back to school projects at the Point of View Back to School Link Party!